前言
這期繼續頭發的話題,以讀2019年Frostbite分享的頭發絲(Hair Strand)渲染方案為主,中間會簡單結合一些我個人的感受和評論。
上期粗讀的分享文檔畢竟是2016年的,雖然成品遊戲《秘境探險4》里感覺是有電影級的真實感的,但是深入細節我們發現他們還處於用面片(Hair Cards)各種做trick調參數的階段。
上期的評論里有人提到Groom(梳頭發)工具鏈,這在3D建模或離線渲染軟體中都是有成熟的工具或插件的,而遊戲引擎中在我了解的范圍目前就只有Unreal支持的比較好了。簡單來說就是頭發的編輯過程是基於頭發絲的真實物理模擬來進行的,也能比較容易的對其進行程序化、參數化的定製——如毛囊大小、濃密度、長短、卷度等;編輯過程中數據存儲成點集或曲線,最終使用的結果可以是導出Hair Card模式的生成式紋理,也可以是Hair Strand模式的頭發絲。這顯然是一個美術人員友好的工具,因為不需要有那麼多人工干預(調整頭發片位置)的痕跡了,出寫實的頭發可以很快;當然劣勢就是得到的結果往往不是性能最優的。
頭發的物理模擬超出了我個人能理解的范圍,我能了解的是其中除了有力學問題,還涉及一個如何進行多線程運算的問題。
*本文的粗讀還是以渲染部分為主,由我自己進行翻譯 ,並力求准確。如需轉載請告知我。
1 頭發絲的優劣勢及渲染方案概述
原文檔的PDF配了解說稿的原文,因此這里把部分重點的原文摘錄下來並翻譯;括號或星號部分則是我自己的補充說明。
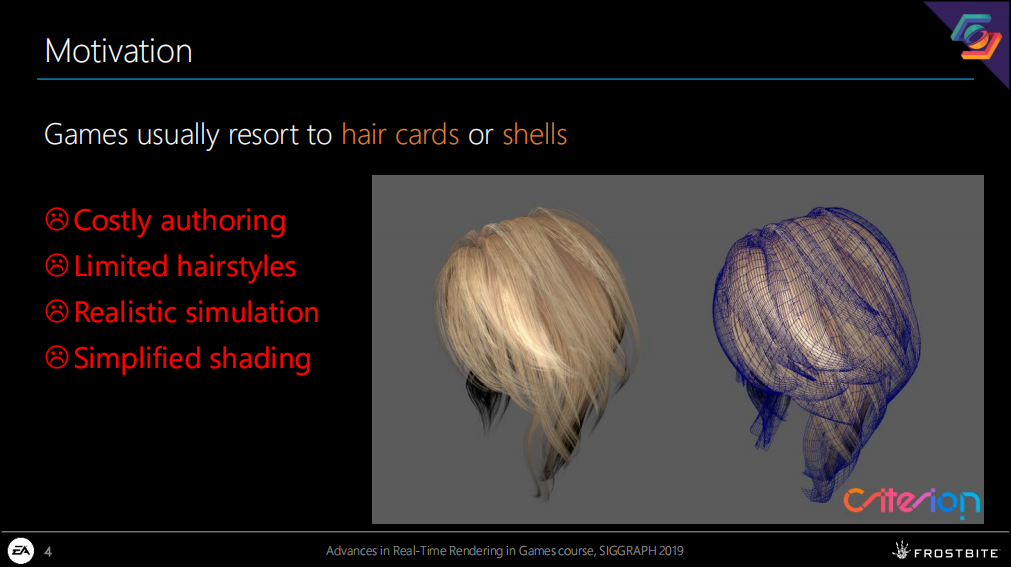
紅字部分分別是:消耗人工、有限的發型、(不能達到)真實感的模擬、(只能採用)簡化的著色
In games it is currently very common to model human hair using hair cards or shells where multiple hair fibers are clumped together as a 2d surface strips. These cards are generated using a combination of tooling and manual authoring by artists. This work can be very time consuming and it can be very difficult to get right.
遊戲中使用2D的頭發片來建模頭發是很普遍的,這通常由美術人員手動製作完成。這項工作可能非常耗時且容易出錯。
If done well these can look good, but they do not work equally well for all hairstyles and therefore limit possible visual variety. And since it is a very coarse approximation of hair there are also limits on how realistic any physics simulation or rendering can be.
即使調出了不錯的效果,也不能保證對所有發型都有好效果,在視覺變換(*如動畫)上也有很多局限性。並且由於採用了非常粗糙的預估模型,導致在表現物理和渲染的真實感上其實都還有很多限制和不足。
It is also common to use very simplified shading models which do not capture the full complexity of lighting in human hair, this can be especially noticeable when shading lightly colored hair.
由於通常都只能採用比較簡單的渲染模型,導致渲染時也無法搞定復雜的光照情況,尤其是為淺色頭發著色時。
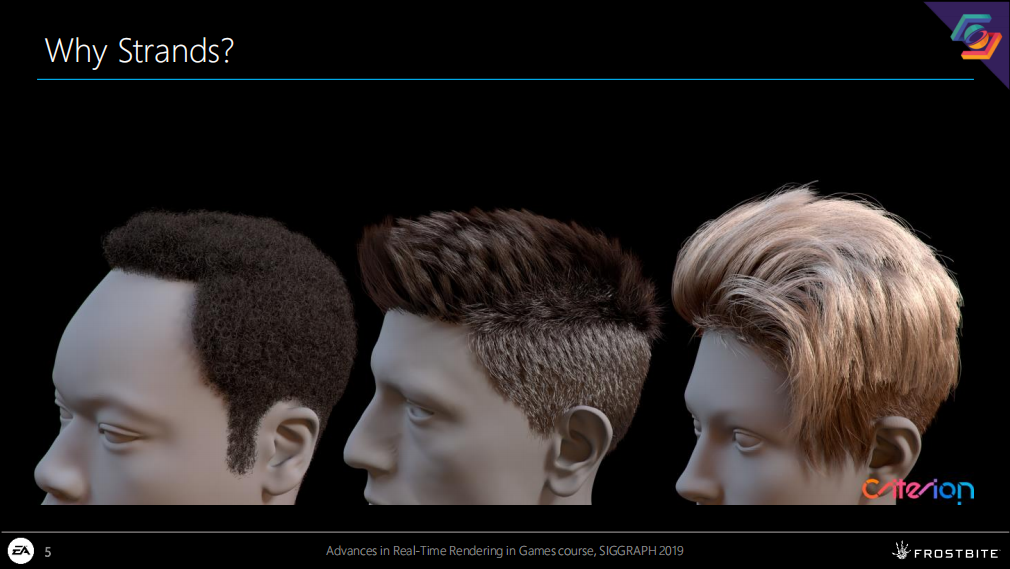
Strand based rendering, where hair fibers are modelled as individual strands, or curves, is the current state of the art when rendering hair offline. …
發絲渲染,指頭發纖維被建模成獨立的絲或曲線,這是目前離線渲染中美術人員製作頭發的方式。
It also requires less authoring time than hair cards since you do no longer need to create them. And since the process of creating hair cards usually also involves creating hair strands for projecting onto the hair cards, you basically save time on that whole step. …
這比使用頭發面片需要的製作時間更少——因為不需要製作和設置頭發面片了。同時由於製作頭發面片往往也是通過把頭發絲投影倒面片上來完成的,這就節省了整個步驟的時間。
With hair-strands it is also possible to do more granular culling for both physics and simulation, and easier to generate automatic LODs via decimation.
頭發絲方案還可以在物理和模擬方面做更多顆粒度的剔除,也能更容易的通過降采樣的方式來自動生成LOD。
The goal of this project is to get as close as possible to movie quality hair, using-hair strands, while still achieving real time frame rates.
這個項目的目標是用頭發絲盡量達到電影級的質量,同時達到實時渲染的幀數要求。
*可以看出頭發絲是一個綜合了美術製作成本和仿真效果的考慮
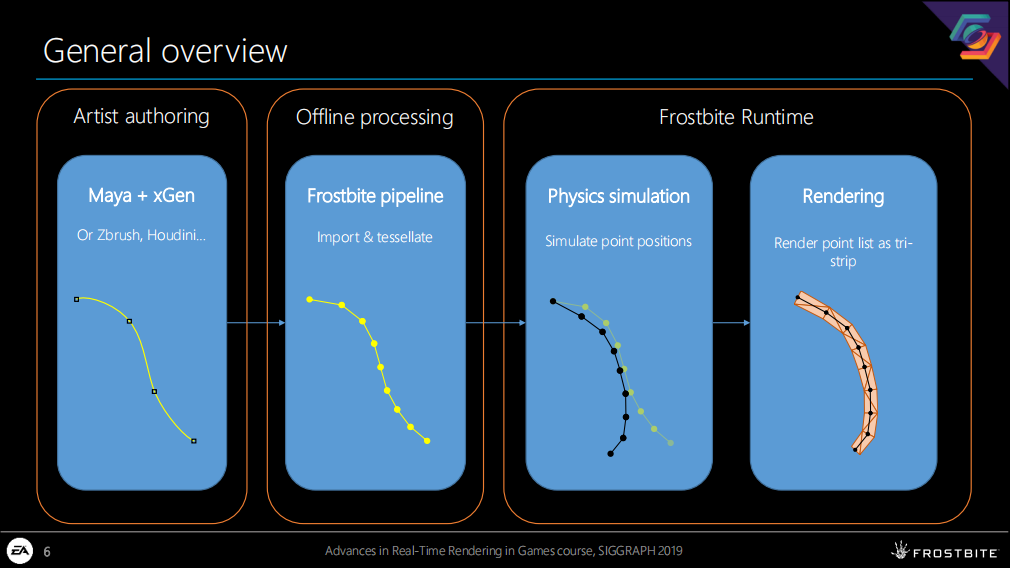
幾個步驟分別是:美術製作、離線處理(Frostbite引擎中)、Frostbite引擎運行時
運行時包含:物理模擬(模擬運算每一個點的位置)、渲染(把頭發絲的點渲染成tri-strip 三角條狀片)
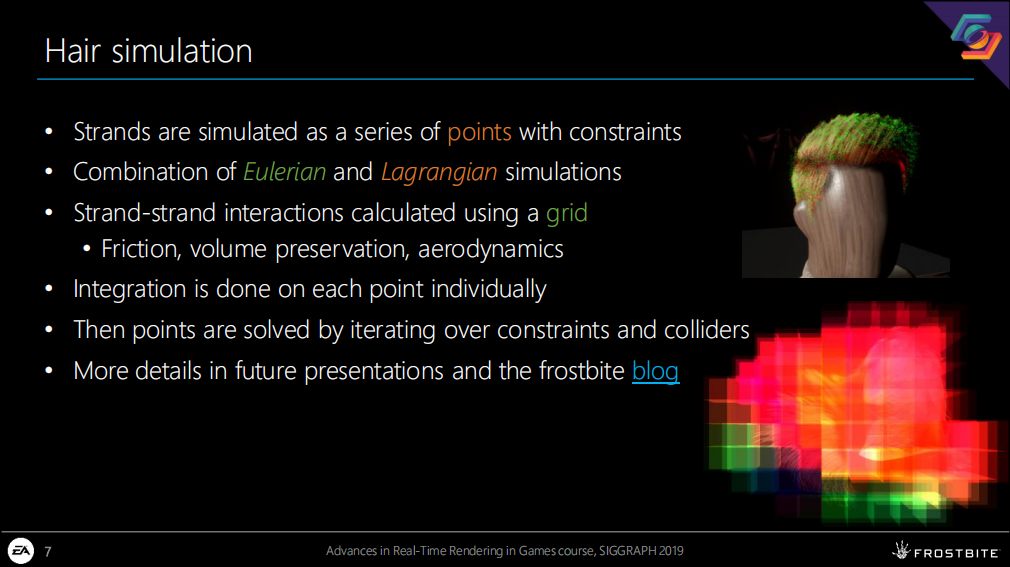
——頭發絲是作為一系列有約束的點集來模擬
——模擬方式組合了歐拉方法和拉格朗日方法
——頭發絲之間的相互作用通過網格的方式來計算(摩擦力、體積保持、aerodynamics 空氣動力學)
——整合時每一個點都是獨立計算的
——點的位置通過疊代處理約束和碰撞來完成
The simulation is a combination of Eulerian, so simulation on a grid, and Lagrangian simulation on the points
*用歐拉方式計算網格模擬,用拉格朗日方式來計算點模擬。更多的原文也沒介紹了,也超出了我個人的理解范圍;不過這里面可以想到的是這麼多點非常依賴多線程來計算。
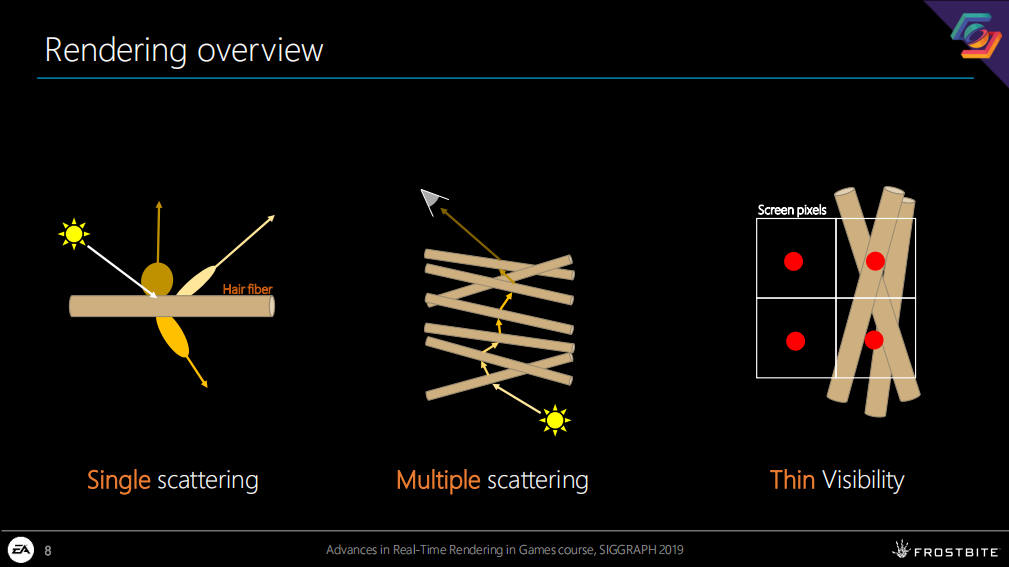
三個方面分別是:單次散射、多重散射、細物體可見性
…The final problem relates to the rendering and how to do it in a way that is performant and does not introduce a lot of aliasing due the thin and numerous nature of hair.
(前面概述散射的省略了)細物體可見性是一個渲染問題,即需要找到以更高性能和不產生大量鋸齒的方式來渲染數量龐大的細頭發的方案。
2 單次散射
*前一篇2016年的《秘境探險4》SIG中,散射還是通過各種高度近似的trick來完成的。在本文中散射就朝貼近光傳播規律邁了一大步。
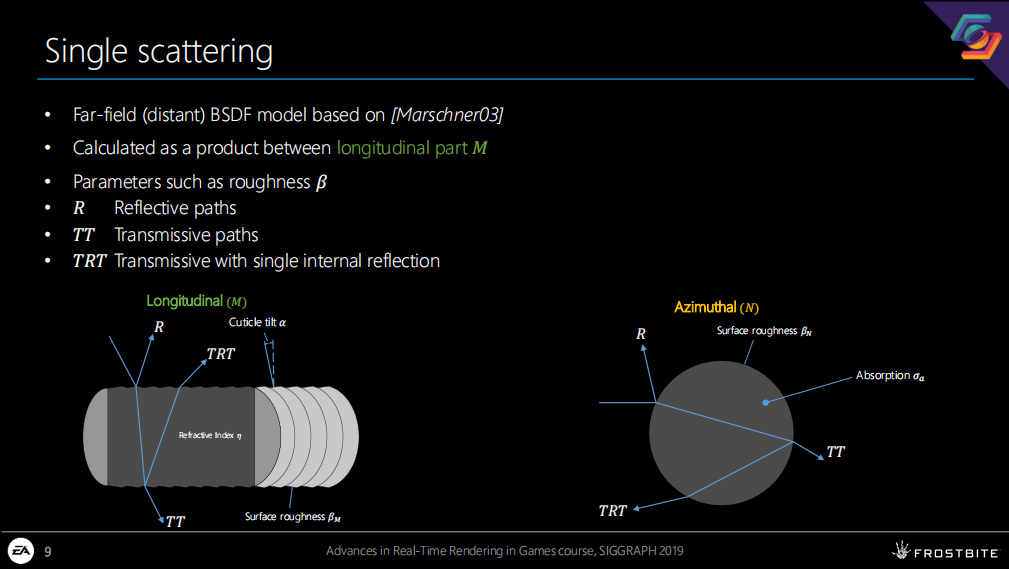
(講述的部分是PPT內容的完全擴展,因此PPT內容就不翻了)
For single scattering we use a BSDF based on an original model for hair created by Marschner et.al. in 2003. The model is a far-field model which means that it is meant to model the visual properties of hair when seen from a distance, not for single fiber closeups.
對於單次散射我們使用的BSDF( Bidirectional Scattering Distribution Function 雙向散射分布函數 )基於2003年的Marschner模型。這個模型是一個遠場模型,意味著這個模型是對遠處觀察頭發的一種歸納,不適合近處觀察頭發絲。
This model was later improved for path-tracing by Disney and Weta Digital and approximated for real time use by Karis, parts of which work we also incorporate.
這一模型後續被Disney和Weta Digital改進用於路徑追蹤領域(離線渲染),而在實時渲染領域由Karis做了近似處理,其中也並入了一些我們的工作。
The model is split up as a product between a longitudinal part M and an azimuthal part N.
這一模型被拆分成一個組合公式,包含了縱向的部分M和徑向的部分N(azimuthal 直接對應的翻譯「方位角」比較繞,本文會將其翻譯成徑向,意義略微有一些偏差但是更好理解)。
It contains parameters such as surface roughness, absorption and cuticle tilt angle.
它包含了如下參數:表面粗糙度、吸收度和角質層傾斜角
Different types of light paths are evaluated separately and added together.
不同類型的光路徑是分別評估計算並加總在一起的。
These are R , which are reflective paths TT which is transmission through the fiber, and TRT which is transmission with a single internal reflection. These paths are also enumerated as p0, p1 and p2.
*這部分與圖中一致,主要是說的Marschner模型的3種基礎光路。上篇文章中也介紹過,這里就不翻譯了。
*縱向可以理解成其切面是粗糙長條形,徑向可以理解成其切面是圓形。後面提到如Nr就是在徑向計算表面反射的意思。
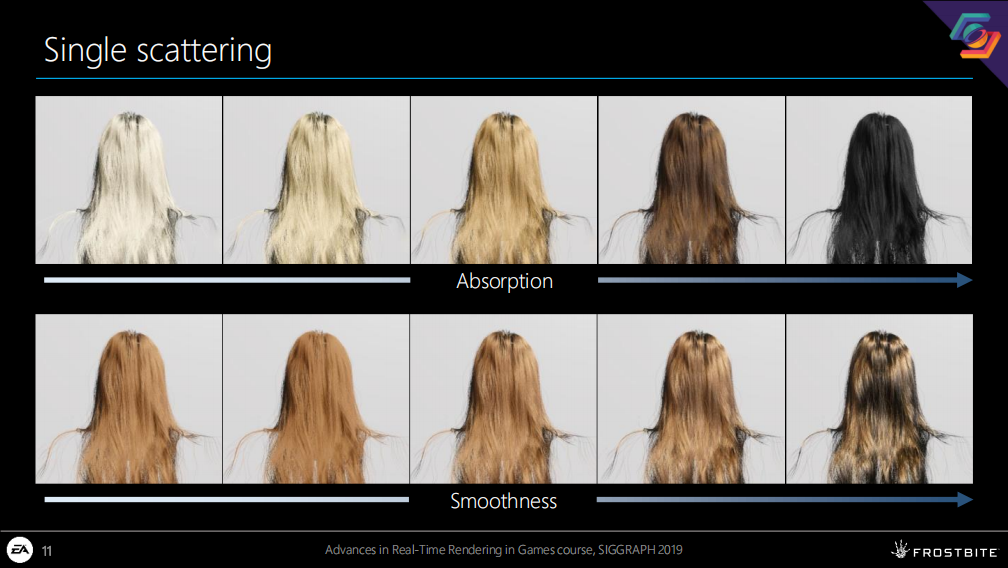
——吸收度:從左到右逐步變高
——光滑度:從左到右逐步變高
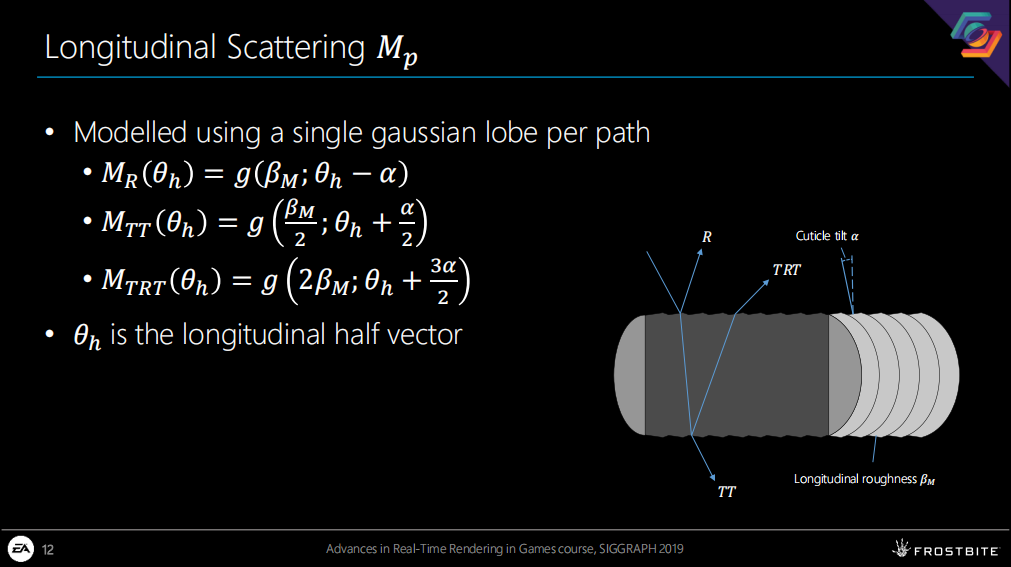
For the longitudinal scattering M, each path type is modelled using a single gaussian lobe with the parameters depending on the longitudinal roughness and the cuticle tilt angle.
對於縱向散射係數M,每一類路徑都被建模成單獨的高斯波瓣,包含縱向粗糙度和角質傾斜角參數。(*類似球諧光照,但用的建模原件不同,lobe 波瓣可以近似理解為空間中的橢圓)
The motivations for these equations are explained in more detail in the Marschner original paper.
採用這些公式的動機和原理在Marschner 的原始論文中有詳細介紹。
*波瓣是輻射和波動或信號領域的常用概念,這里用來進行近似光傳播計算。概念背後的數學思想已經完全超出了本人的理解范圍,文末會附帶 《Real-Time Rendering 4th》中相關的引用介紹。
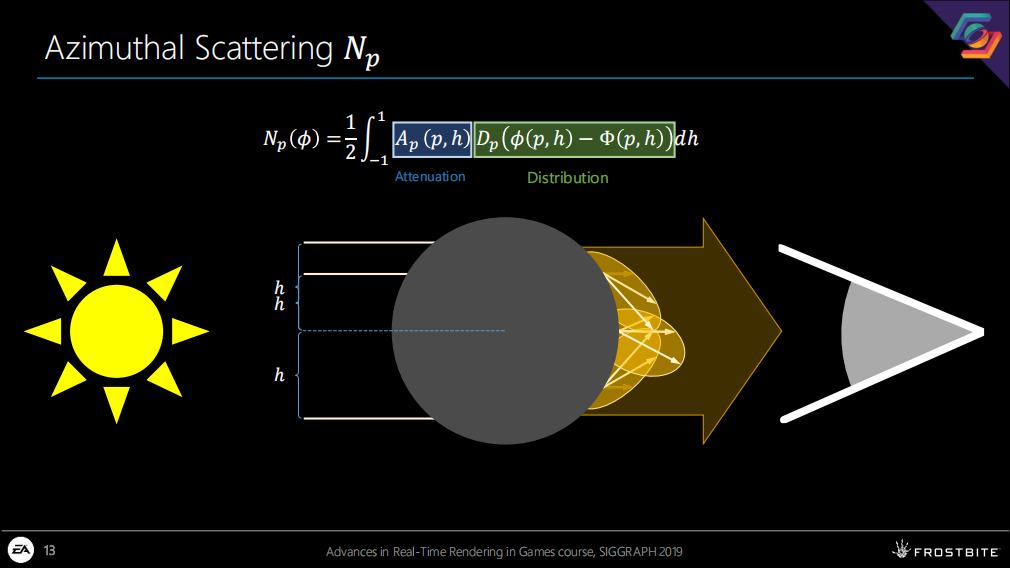
The azimuthal scattering is split up into an Attenuation factor A, which accounts for Fresnel reflection and absorption in the fiber, and a distribution D which is the lobe modelling how the light scatters when it is reflected or exits the fiber.
徑向散射被拆分為衰減係數A(代表頭發纖維的菲涅爾反射度和吸收度),以及分布係數D(用波瓣的方式建模光線如何在頭發纖維反射或離開纖維體)。
To properly simulate surface roughness for transmitted paths, this product is then integrated over the width the hair strand to get the total contribution in a specific outgoing direction.
為了正確模擬光傳輸路徑的表面粗糙度,這個公式需要在頭發絲寬度這一維度上進行積分,以得到特定出射方向的總貢獻度。
Numerically integrating this equation for every shading point and light path is of course not feasible to do in real-time. So we have to approximate.
對每一個著色點和光路都進行這種程度的積分不是一個實時渲染的可行方案,因此我們必須進行預估。
*看到approximate就想到,這里又會引入近似公式和LUT(Look Up Table)了。
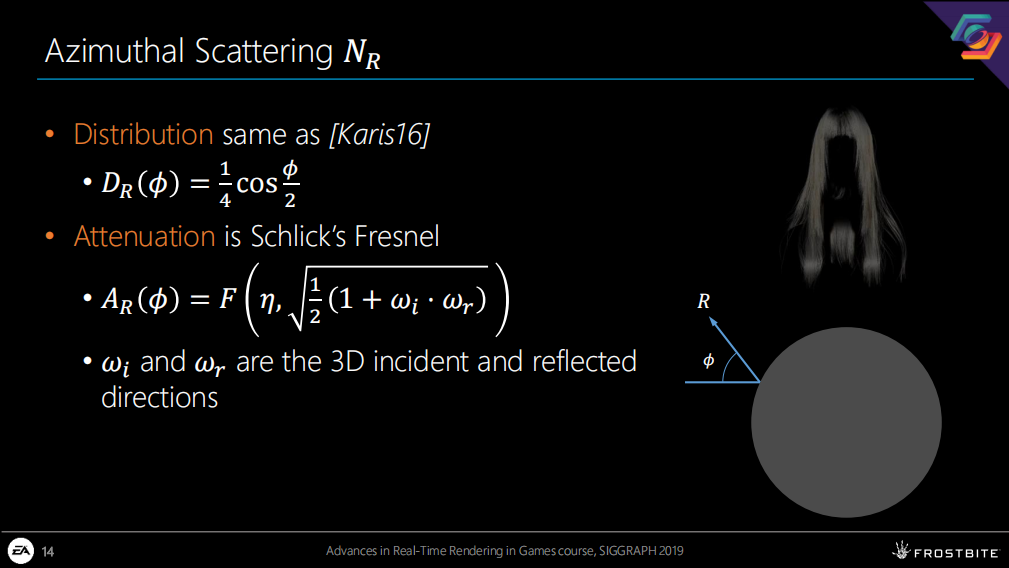
(前一頁介紹的是通過情況,這里是反射的情況)
分布公式採用了2016年Karis的方案(應該是Unreal的一篇分享),衰減採用了Schlick菲涅爾公式(一種近似菲涅爾方案)。
wi和wr分別是3D空間的入射和反射方向。
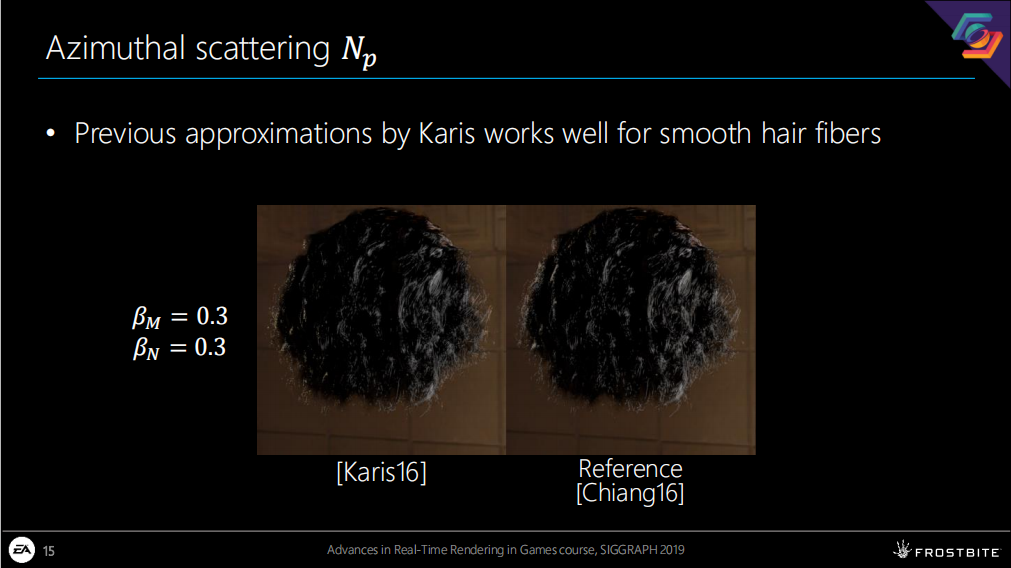
Karis的方案對於光滑的頭發絲近似效果比較好。(右側是對應的當年離線渲染的結果,βm和βn是前面提到的吸收度和光滑度係數)
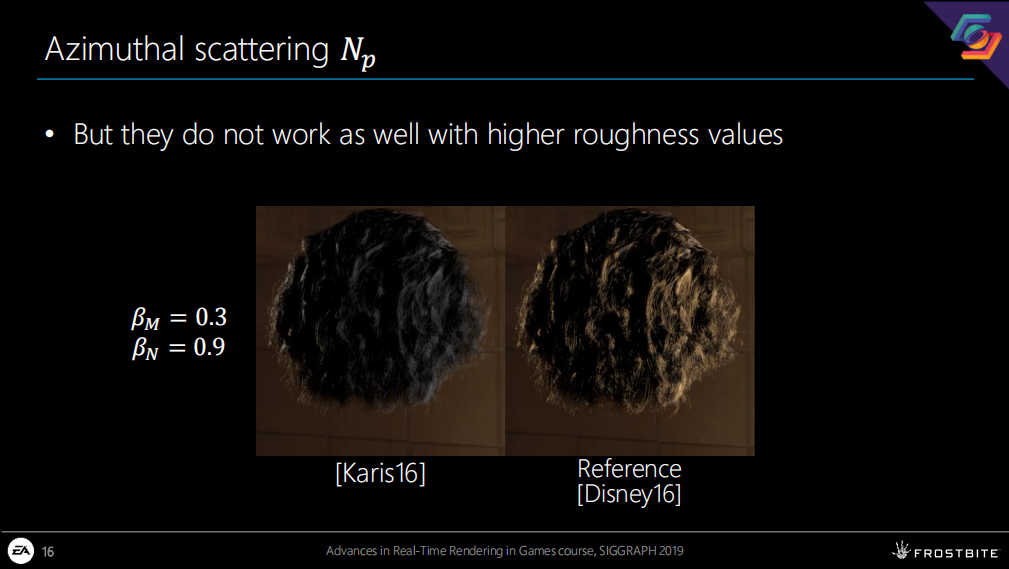
但粗糙度較大時得出的效果不理想。(右側是16年Disney的離線渲染結果)
…and the appearance is getting more dominated by internal absorption.
(效果不理想的原因)渲染的結果中內部吸收的權重太高了。
*下面主要介紹的就是他們對近似方案中的衰減計算進行的改進。
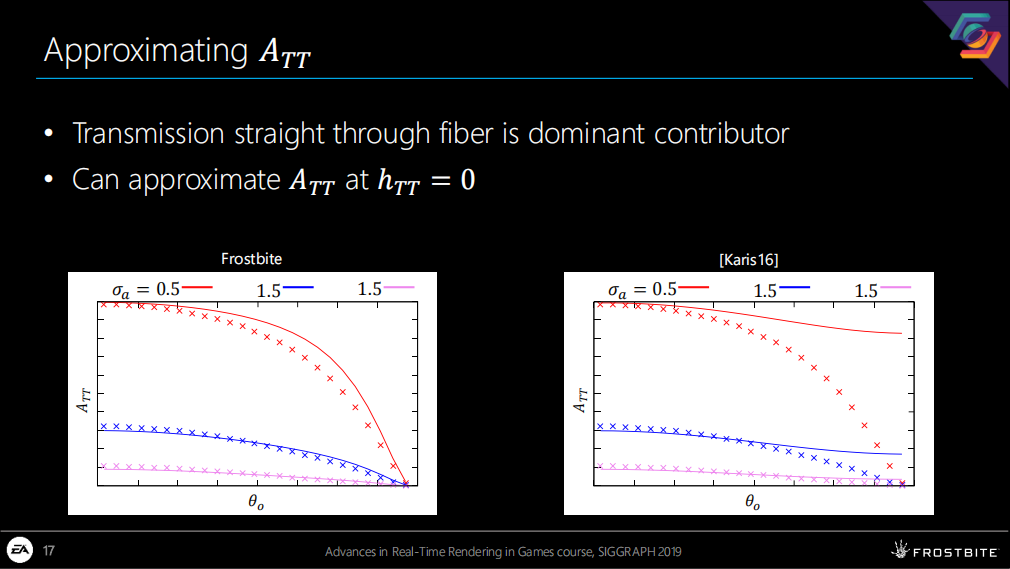
*由於通過發絲纖維柱體中心的通道在衰減係數中占絕對權重,因此可以用h等於0來近似計算通過頭發光路的衰減係數Att。
Here is a plot showing this approximation for three different absorption values with the reference integral drawn as crosses and the approximation drawn as a solid line.
這里用圖表展示了3種不同吸收度值下預估值和積分值的對比情況,虛線是積分值,實線是預估值。
And here is a plot showing how the approximation Karis used stacks up and one can see that it has some problems with grazing angles, especially with more translucent, brighter hair.
另一張圖表展示了Karis的方案由於誤差堆疊,在計算較大掠射角、更透明明亮的頭發時有很大偏差的原因。
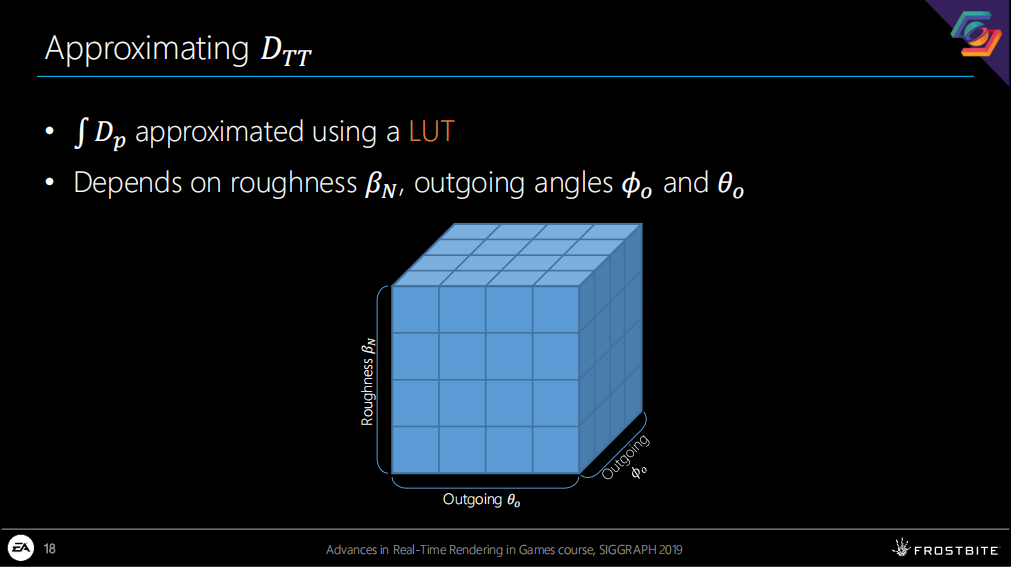
For the distribution we use a LUT. The distribution depends on roughness, azimuthal outgoing angle and the longitudinal outgoing angle which means that the LUT becomes be three dimensional.
我們使用LUT來近似計算分布。分布的估算基於粗糙度、徑向出射角以及縱向出射角,這意味著使用的LUT需要包含3個維度。
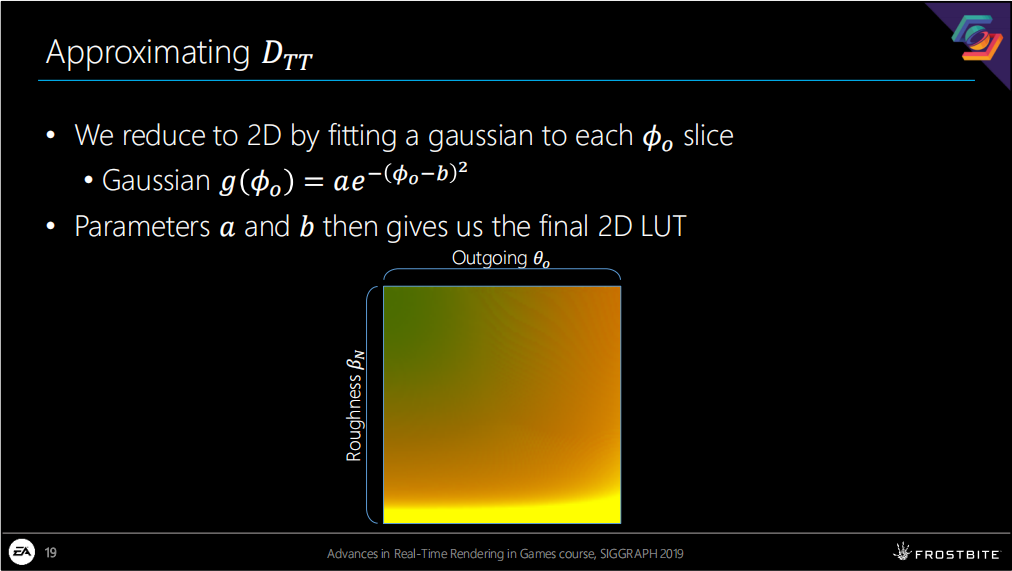
But instead of storing this whole 3D texture, we instead reparametrize it down to 2D by fitting a gaussian function to each azimuthal angle slice.
相比於存儲數據到3D紋理,我們通過把不同(出射角對應的)方位角切片帶入擬合的高斯變換函數的方式,使其重參數化並降維到2D。
So the parameters a and b, in the gaussian, are fitted to the integral and we then store them in a two-channel 2D texture.
函數中的a和b,通過擬合到積分的方式將結果存儲到一個兩通道的2D紋理中。
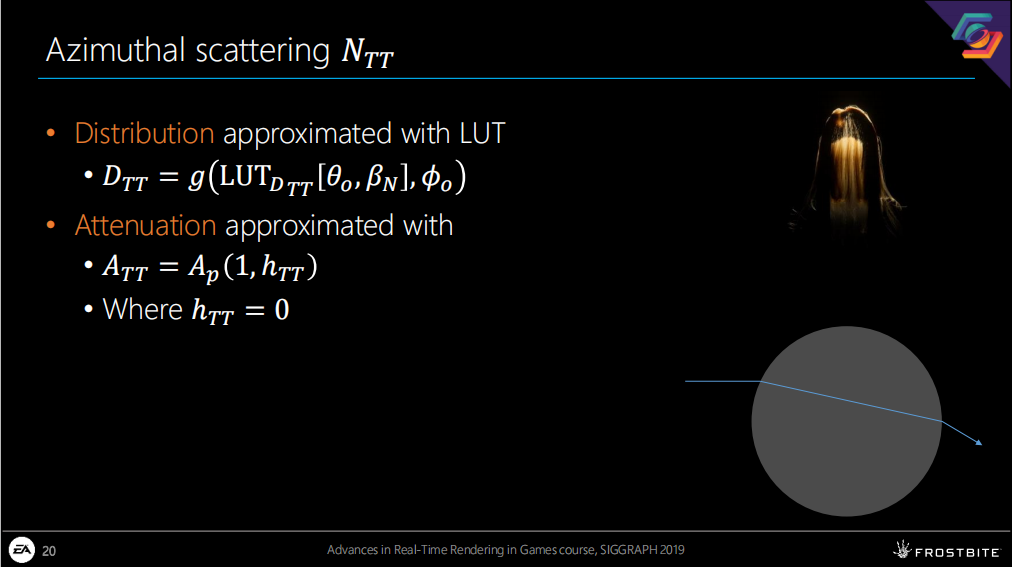
*這一頁主要總結了前面近似推算分布和衰減的思路,分布使用了LUT,衰減假設了h等於0
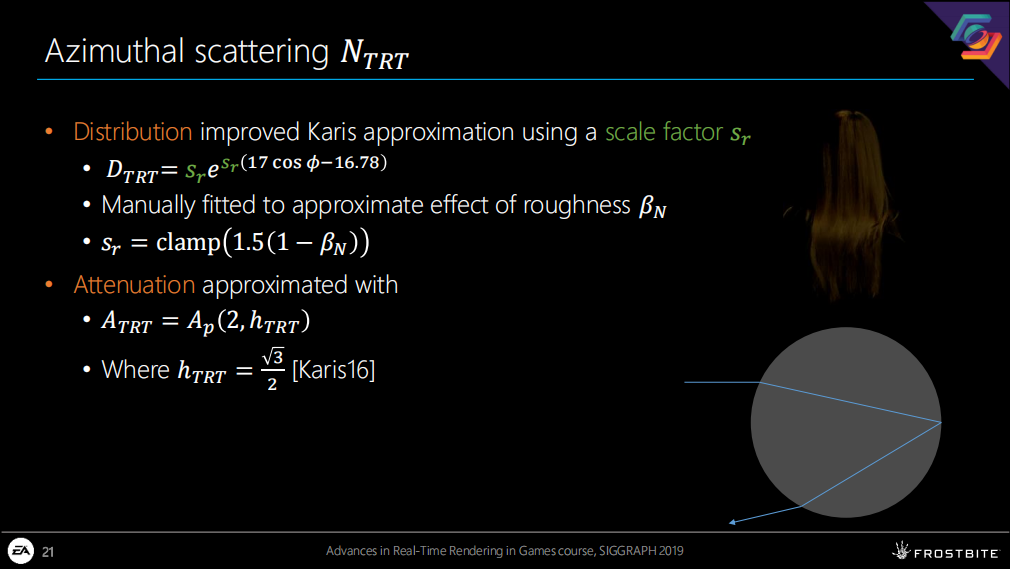
And now for the final TRT path. For the distribution we improved upon Karis approximation by adding a scale factor 𝑠𝑟 which you can see highlighted in the equation here. This scale factor was manually adapted to approximate the effect of surface roughness, like this.
最終對於TRT路徑,在分布上我們在Karis的近似計算上進行了改進,加入了縮放係數Sr。這一係數以手動調整的方式來近似計算不同粗糙度表面的效果。
This approximation is, however, still quite pretty coarse and may need some more work to improve the visual quality in some cases.
這一預估仍然非常粗糙,在某些情況下仍然需要做改進以提高視覺效果。
The attenuation term we approximate in the same way we did for the transmissive path, but here instead we use an h value of square-root of three divided by 2. Which is the same constant used in Karis approximation.
衰減的近似方案和投射光路中的類似,只是這里我們設定h等於二分之根號三。這和Karis的近似計算中使用的常數一致。
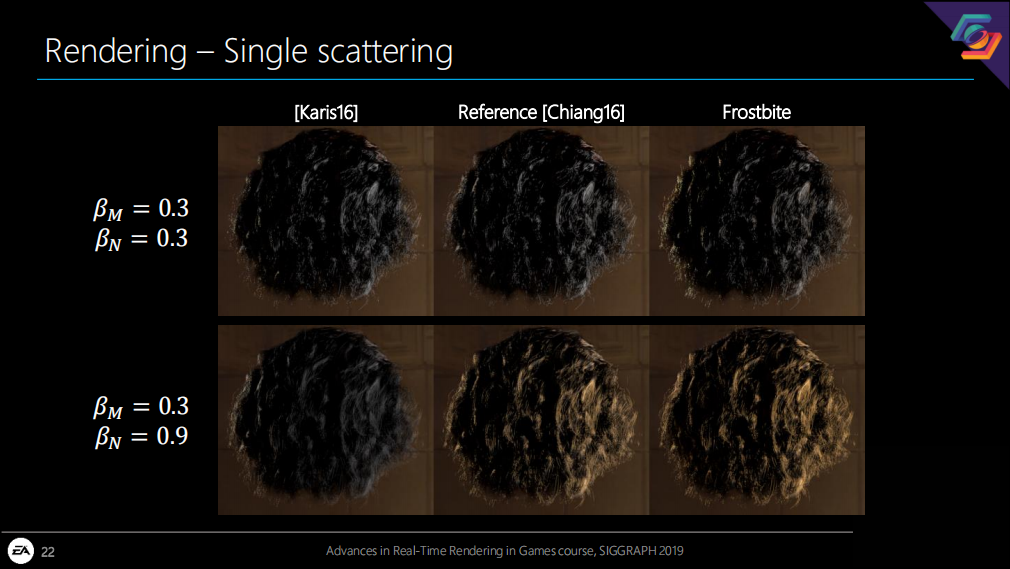
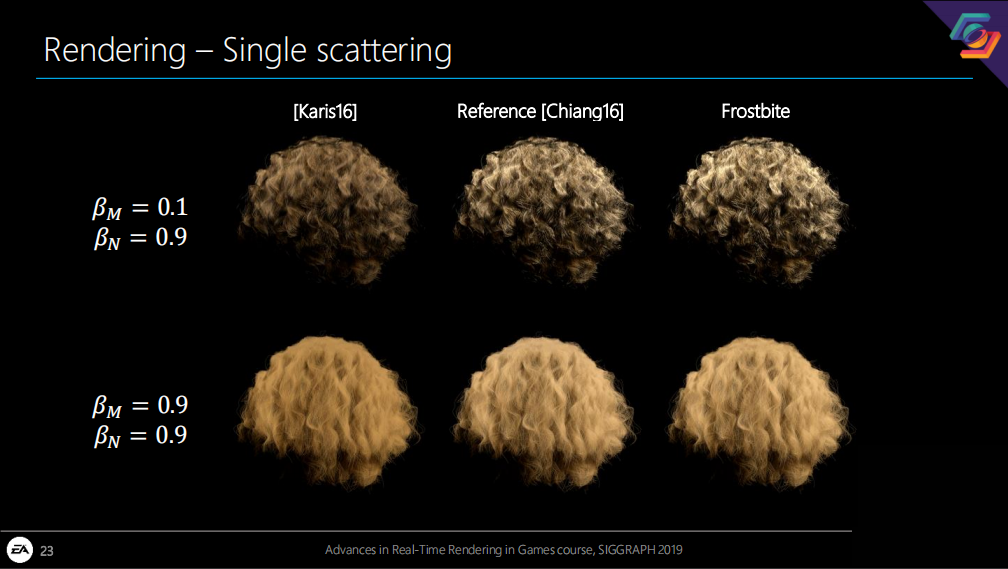
*圖中展示了不同參數值下的對比情況,中間的參照是當時效果比較好的離線渲染模型的結果。
3 多次散射
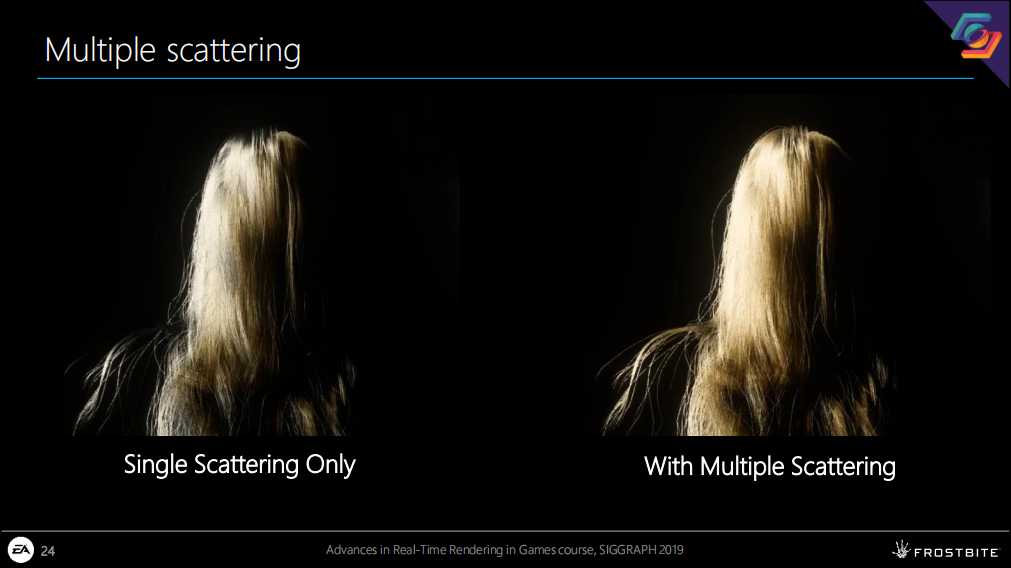
*左側是單次散射,右邊是考慮了多次散射的結果。由於納入了更多計算中損失的光能,所以結果會顯得更亮。
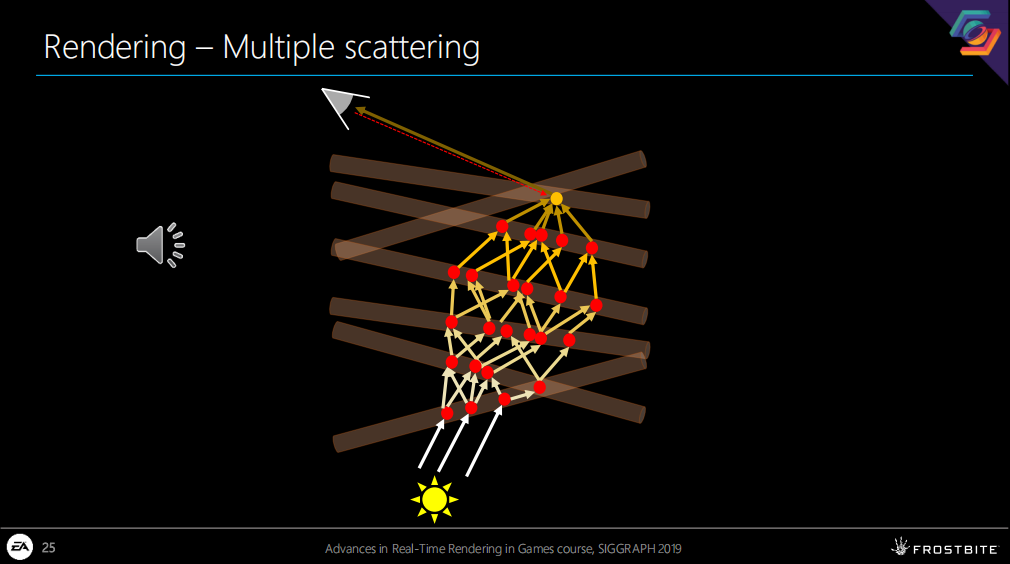
In contrast with single scattering, which aims at capturing how light behaves in a single fiber, multiple scattering tries to model the effect when light travels through many fibers.
和單次散射相比,多次散射的目標是實現光通過很多頭發絲時的效果。
This means that we need to evaluate multiple paths that the light travel between a light source and the camera. This is of course not feasible for real-time rendering, so we need to approximate this effect as well.
這意味著需要計算光源和攝像機之間通過頭發的非常多光路。這顯然不是一個實時渲染下可行的方案,因此我們也需要做近似計算。
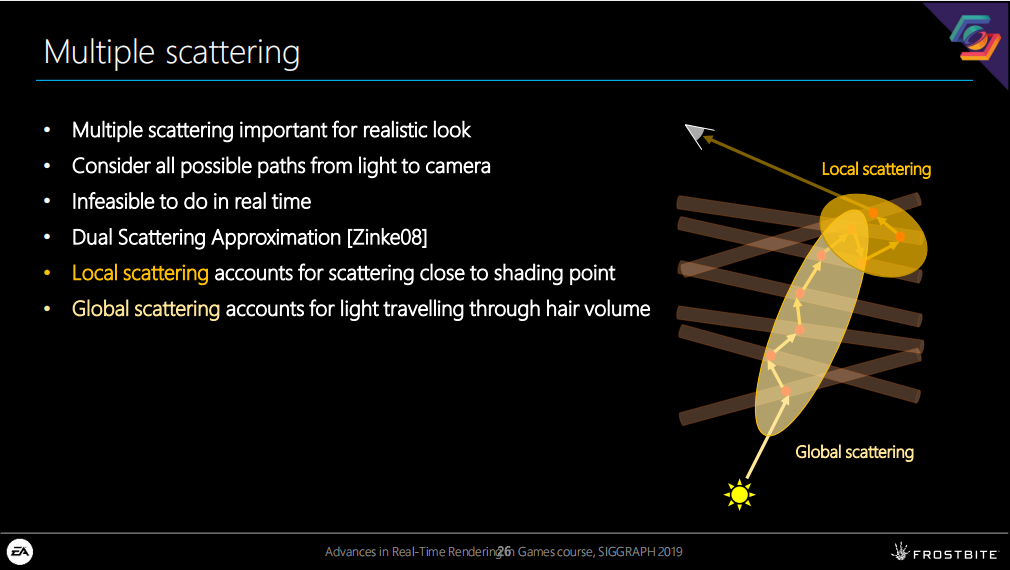
In our implementation we use an approximation called Dual Scattering. The point of dual scattering is to approximate multiple scattering as a combination of two components.
我們採用的近似方案叫Dual Scattering,它的要點是用兩個組件的組合來近似計算多重散射。(就是後面提到的Local scattering和Global scattering)
Local scattering accounts for scattering in the neighborhood of the shading point and accounts for a lot of the visible hair coloring.
Local scattering負責處理著色點的相鄰元素和大部分頭發顏色可見性問題。
Global scattering is meant to capture the effect of outside light travelling through the hair volume.
Global scattering目的是實現光路穿過整個頭發體積後的效果。
The reason that the dual scattering approximation works well for hair is because most light is only scattered in a forward direction. So basically because we have more contribution from TT than TRT.
Dual scattering的近似方案能運作較好的原因是因為光傳播主要還是前向散射為主,基本上計算時TT和TRT還是有更多權重。
Global scattering is estimated by only considering scattering along a shadow path, or light direction. Therefore we need some way of estimating the amount of hair between two points in the hair-volume in the light direction.
Global scattering的近似方案中,我們只考慮沿著陰影路徑或光線方向的散射。因而我們需要能估計光線方向上,在頭發體積中兩點之間的頭發數量的方式。
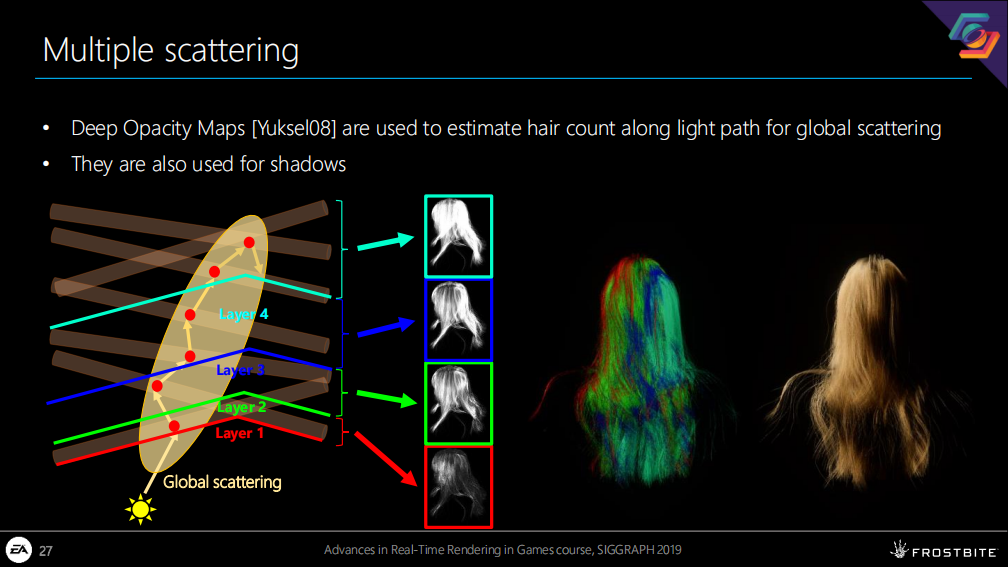
We do this the same way the authors did in the dual scattering paper; we use Deep Opacity Maps. Deep opacity maps are similar to Opacity shadow maps, a technique where shadow maps for a volumetric object is generated in a lot of slices over the object.
參照dual scattering論文作者的做法,我們使用了Deep Opacity Maps。它很類似Opacity shadow maps,也是一種為體積物體生成多層切片的陰影紋理的方式。(*Opacity shadow maps上次頑皮狗的文章里提到過,兩者之間的區別是分層的方式不同)
The benefit of deep opacity maps is that it require a lot fewer layers and it does not suffer from banding artifacts common with opacity shadow maps.
它的優勢是需要更少的層,以及不會有opacity shadow maps的帶狀偽影問題。
The attenuation due to the scattering is then calculated, averaged and stored into a LUT. The deep opacity maps are also used to determine shadows.
多層散射的衰減被預計算、平均化並存儲到LUT中。Deep opacity maps也可以被用來計算陰影值。
As a lower quality fallback one can also estimate the attenuation using a hair density constant and the Beer-Lambert law. But this will of course not adapt with the actual changes of the hair volume.
作為一個較低質量的替代方案,還可以使用Beer-Lambert法則中的頭發強度常量,不過這在頭發體積變化時就不能自動適應了。
*可以看到多次散射主要還是通過一些經驗模型來近似,核心改進思想就是Deep Opacity Maps。下面補了一張圖說明兩者的區別:
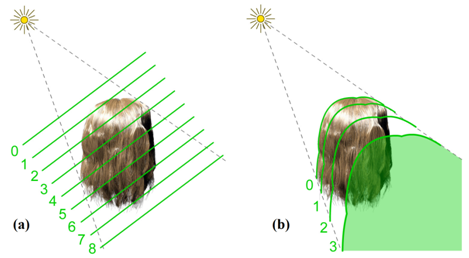
左側是Opacity Shadow Maps,右側是Deep Opacity Maps。
4 特細物體的可見度
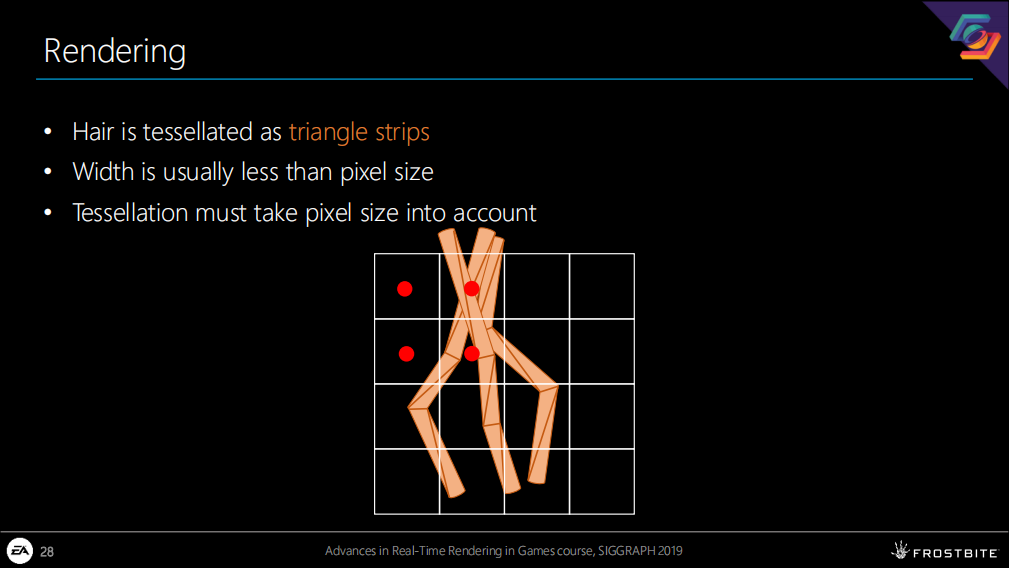
The hair-strands are tessellated and rendered as triangle strips so we must take special care to properly handle aliasing. Since the strands are very thin, they will usually have a width that is less than that of a screen pixel.
頭發絲在渲染時被拼構成三角面構成的長條,因此必須特殊關注抗鋸齒問題。由於頭發絲往往很細,通常都小於一個螢幕像素寬度。(*tessellated沒有一個特別合適的中文翻譯,在這里拼構比鑲嵌合適一些)
We therefore need to take the pixel size into account when tessellating, and increase the width appropriately, or we will risk getting missing or broken up hair strands.
為此我們在拼構時需要把像素尺寸列入考慮,並以合適的方式增加寬度,否則就會有丟失或破壞頭發絲的風險。
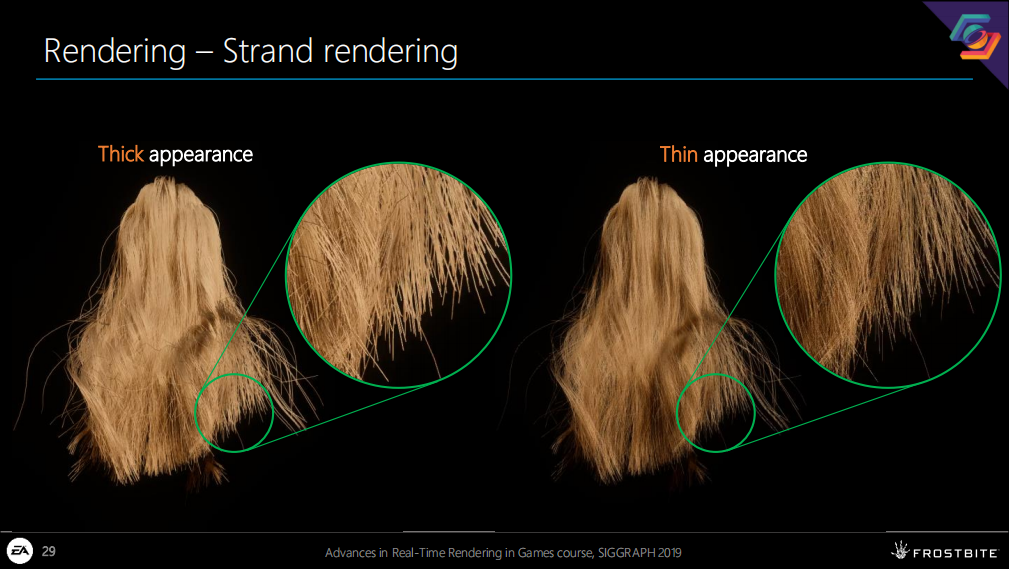
Unfortunately, this will have another not so nice side effect which can cause the hair to look too thick and more like thicker spaghetti or straw. Another problem is that the amount of overdraw which will be massive and hurt performance a lot.
不幸的是,這(加寬)會帶來副作用——使頭發看起來太厚了,像面條或是稻草一樣;另一個問題是Over draw太多了會影響性能。
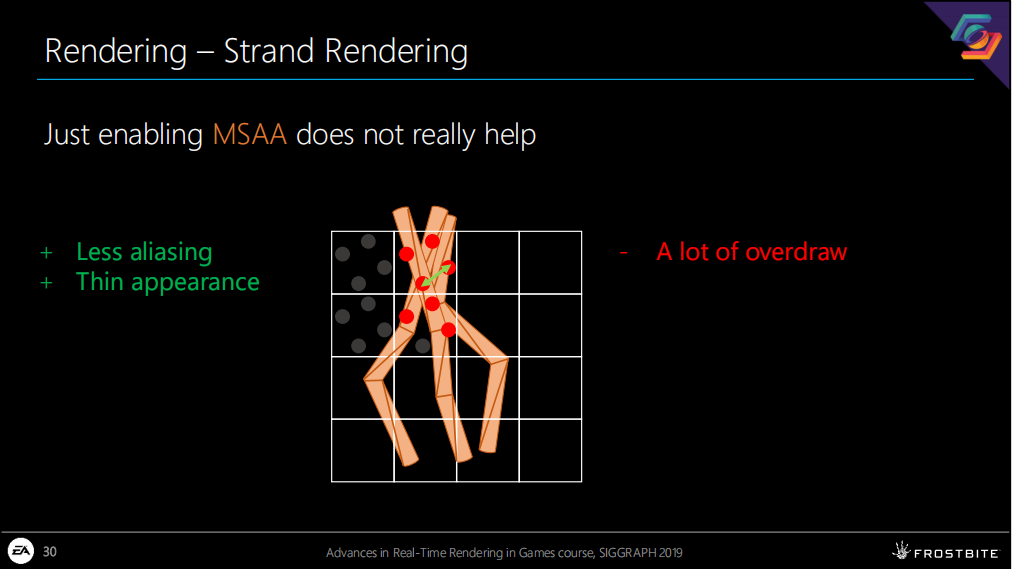
Just enabling MSAA does unfortunately not solve all problems. While it does improve on aliasing issues, by taking more samples per pixel, and therefore allows us to keep the thin hair appearance. It will suffer an even bigger performance hit due to overdraw, because there will be more of it.
單純啟用MSAA不能解決所有問題。雖然它確實能改善鋸齒問題,但由於採用了更多的像素點用於計算和渲染,因此也會帶來更大的性能問題。
To reduce the amount of overdraw we use a visibility buffer.
為了降低overdraw的數量我們使用了一個可見性緩沖。
*常見的減少overdraw的思路就是接近不透明就不繼續渲染了,並且把後續螢幕空間渲染的數據准備好,這里的緩沖區應該也是類似的。但具體的計算細節原文沒有公布,例如不同面積頭發絲對某一像素格著色的權重如何增加之類。
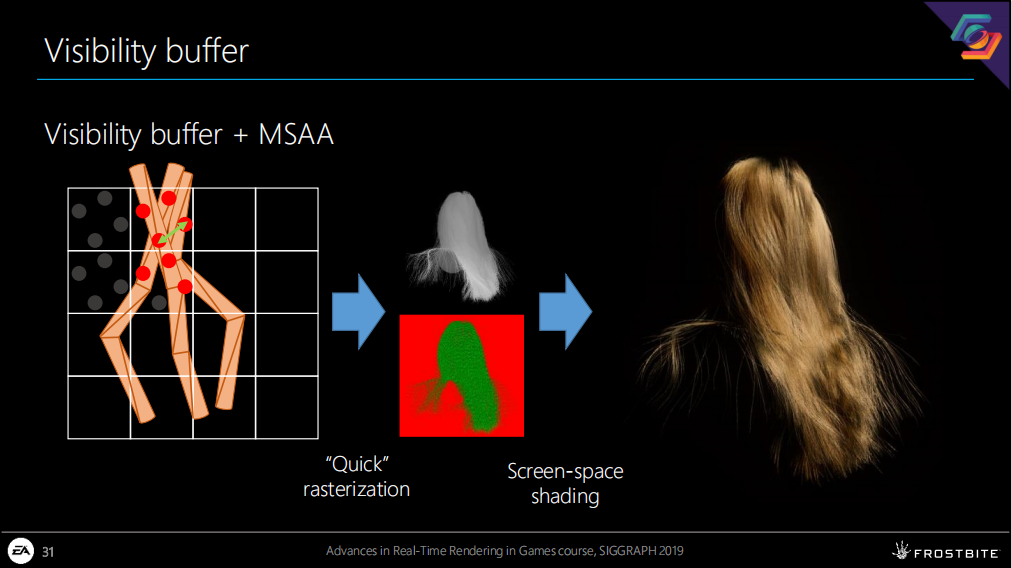
With the visibility buffer we can do a relatively quick rasterization pass, with MSAA, for all hair strands. We can then use that information to do a screen-space shading pass to get the final antialiased render.
通過可見性緩沖我們可以相對快速的進行光柵化Pass,結合MSAA(還能在性能可接受范圍時)渲染所有頭發絲。接著我們可以使用光柵化的信息來做螢幕空間的著色來得到最終抗鋸齒的渲染效果。
There is still, however, some unnecessary shading going on because we may be shading the same strand multiple times per pixel.
這里仍然會有一些不必要的著色步驟,因為我們可能對某一個像素的同一頭發絲渲染了多次(*因為頭發絲分段的原因)。
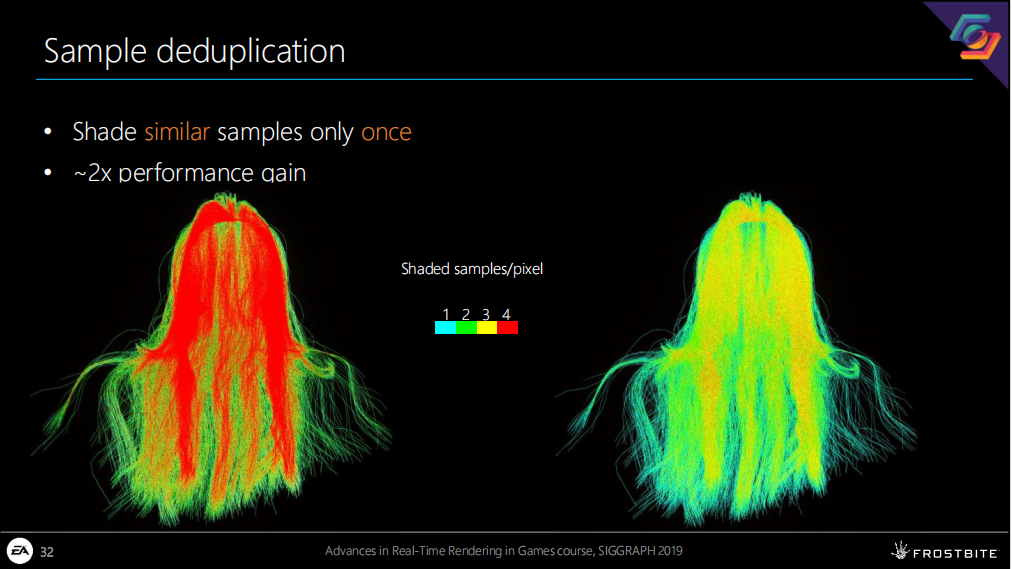
To reduce this over shading we also run a sample deduplication pass on the visibility buffer so that we only shade samples within a pixel when they are considered different.
為了減少重復著色我們引入了一個采樣去重復通道,它在可見性緩沖的基礎上只對同一個像素中視為完全不同的著色樣本(*如另一個頭發絲)進行著色。
This reduces the number of pixel-shader invocations greatly and it gave us roughly a 2 times performance increase compared to just using the visibility buffer.
這極大的減少了像素著色的調用,比起只使用可見性緩沖提升了大約2倍的性能。
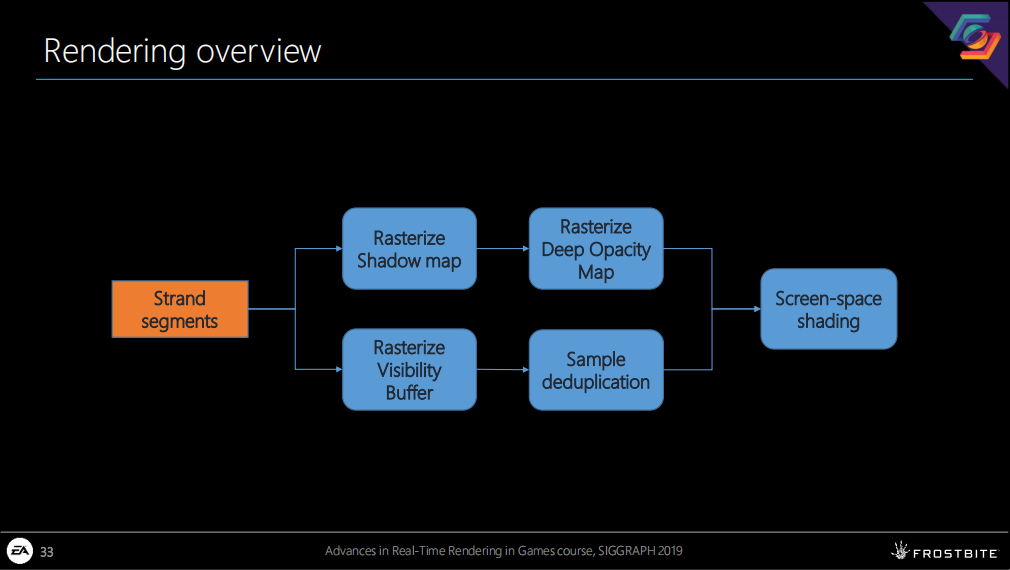
*這里就不翻譯了,完整的管線對應的就是前面提高的幾個部分的組合。
5 性能總覽
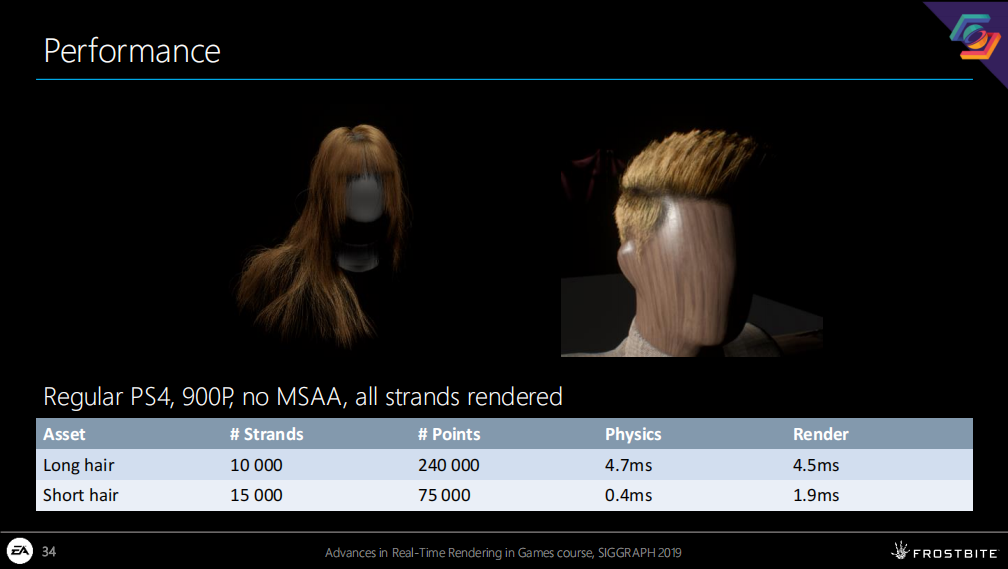
At Frostbite we usually work very close with the game teams to ease the introduction of new tech. And when they have it, they are usually very good at finding ways to get more with less.
在Frostbite 我們通常和遊戲部門走的很近以介紹和引入這些新技術。一旦他們掌握了,他們通常能更擅長找到以少勝多的運用方式。(*結合《冒險聖歌》項目,這句話給人感覺他們的引擎是瘸腿的,太重視渲染而忽視功能了)
In any case, here are some numbers showing what the performance is currently like on a regular PS4 at 900p resolution, without MSAA, with the hair covering a big chunk of the screen.
這里展示了一些頭發覆蓋畫面主要內容時的渲染數據——基於PS4普通版900解析度,關閉MSAA。
The main reason for the long render times are currently that our GPU utilization is very low, something we are currently investigating different ways to improve.
長頭發耗時較長的主要原因時我們對GPU的利用率還很低,這也是我們正在研究改進的方向。
In comparison some of the alternative hair simulation system only simulate about 1% of all hair strands. Early experiments show that we can get a 5x performance boost by simulating only 1/10th of all strands and interpolating the results.
作為對比,某些替代的頭發模擬系統僅模擬1%的頭發絲。早期的實驗表明,僅模擬十分之一的頭發絲和通過插值計算能為我們提高5倍的性能。
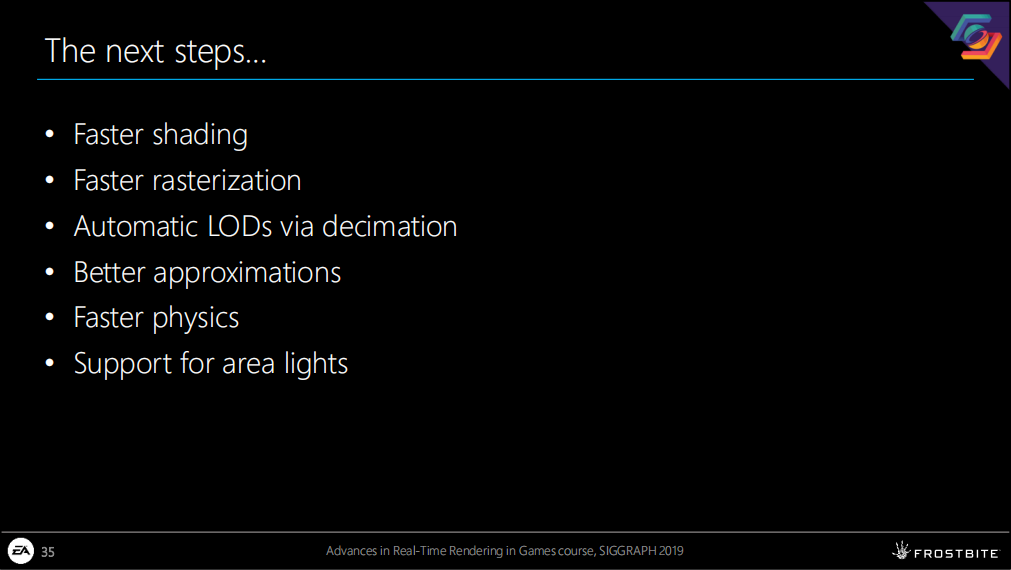
更快的著色、更快的光柵化、基於數據抽取的自動LOD、更好的近似計算、更快的物理模擬、支持區域光
結語
總結一下,此方案光傳播計算還是基於R、TT、TRT這3個歸納的光路進行,首先對單個頭發絲獨立運算,對不同的光入射角採用了2種光路模型(縱向、徑向),對於其中的一些計算細節如衰減和分布係數等都在前人的基礎上做了優化調整。
在多重散射部分,他們在前人論文的基礎上進行了改進組合,採用了2個渲染組件分別處理不同著色情況。
最後在螢幕著色部分,他們通過采樣去重和可見性緩沖的組合,提高了渲染的性能和效果。
雖然過程中也用了很多近似計算,但近似和Trick最大的區別是,近似是能覆蓋絕大多數參數條件的,不會受光源、陰影、發型等原因導致特別失真,它不會產生數量級上完全錯誤的情況。
即便如此,可以看到基於頭發絲的渲染對於大型3A遊戲來說還是一件持續進行中的事,耗費了很多精力和製作頭發絲帶來的畫面提升可能對普通玩家來說不那麼明顯,這也是一個很現實的問題。在今後5年左右的時間內,個人感覺僅渲染少量頭發絲還會是一個主流方案——其餘的部分可以依據不同發型採用面片或插值計算的方式來渲染。
頭發的話題可能暫時告一段落,這個技術後續的提升方向主要在多線程和AI方面,但落實到實際成品遊戲中的還太少,畢竟遊戲硬體的高速發展和普及也已經過了其黃金年代了;如果要考慮光線追蹤,這又會是完全一套不同的方案了。
最後是一些資料連結:
EA官方的相關展示視頻
Deep Opacity Map的Paper地址
虛幻5中的頭發工作流
知乎上翻譯的 Real-Time Rendering 4th(原版是一本紙質書)
本文對應的PDF下載
來源:機核
